Sun Seeker – Finding a Window’s Sunlight Exposure

This image has an empty alt attribute; its file name is img_1751.png

This article explains how you can use the Sun Seeker iOS app to get valuable information about a property’s sunlight exposure by using the app on-site.

Whether you are interested in your existing home or office’s solar exposure, or wanting to understand more about the sunlight availability and exposure of a property you are thinking of renting, buying or moving into, you can easily assess each room or window of interest using Sun Seeker, by following these steps.

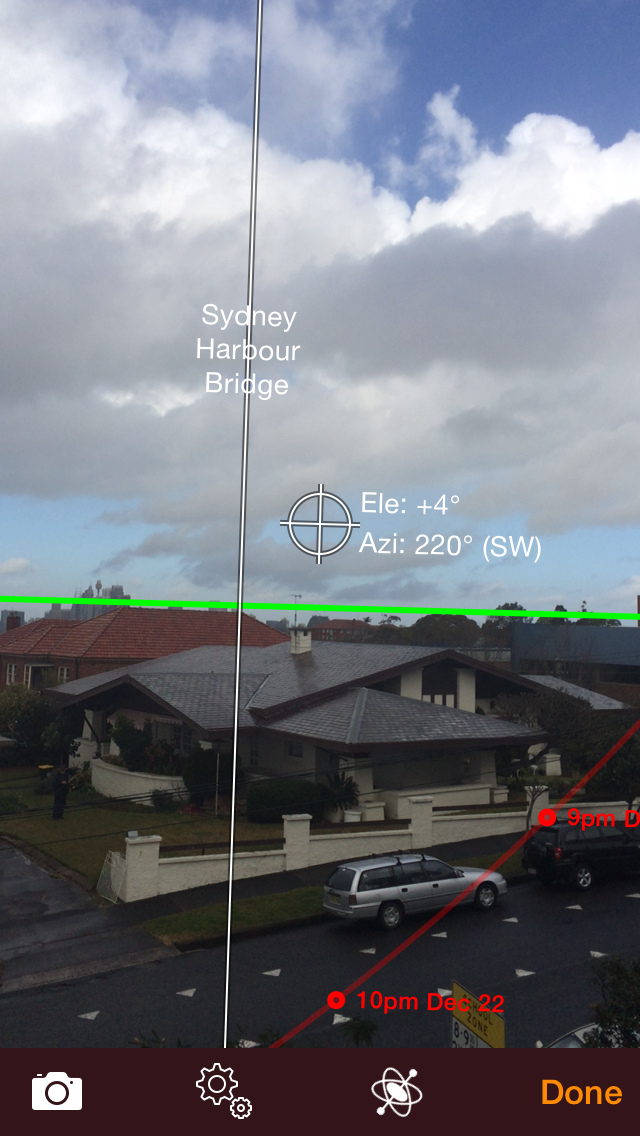
Firstly, stand by the window you are interested in, make sure the Sun Seeker app is running, then tap on the 3D View button to open the augmented reality camera view (shown above). You can use the app either in portrait or landscape mode. I am using landscape in this case because it allows me to show more points of interest for this article, but you can choose whichever helps you see more of the relevant parts of the sun’s path.

Due to the inherent limited field of view of the camera on the device, you may need to move it around to see the entire range of view through the window. However, in this particular example we will start by looking at the features of interest we see by looking towards the position of the sun at sunrise.

In this case I have in fact taken a screenshot at precisely the time of sunrise on this day (12th May). Choosing a time at which the sun actually visible from the window is helpful in that it allows us to be sure that the sun’s position and path is accurately aligned with the true direction of the sun. i.e. to have an accurately calibrated heading. Of course this will not always be possible, so there is a detailed explanation below describing various other ways of calibrating the heading, if needed, but for now we will continue on the assumption that we already have the best available heading calibration (as we obviously do in the sample screenshot shown above, given that the sun’s icon does align exactly with the actual sun).

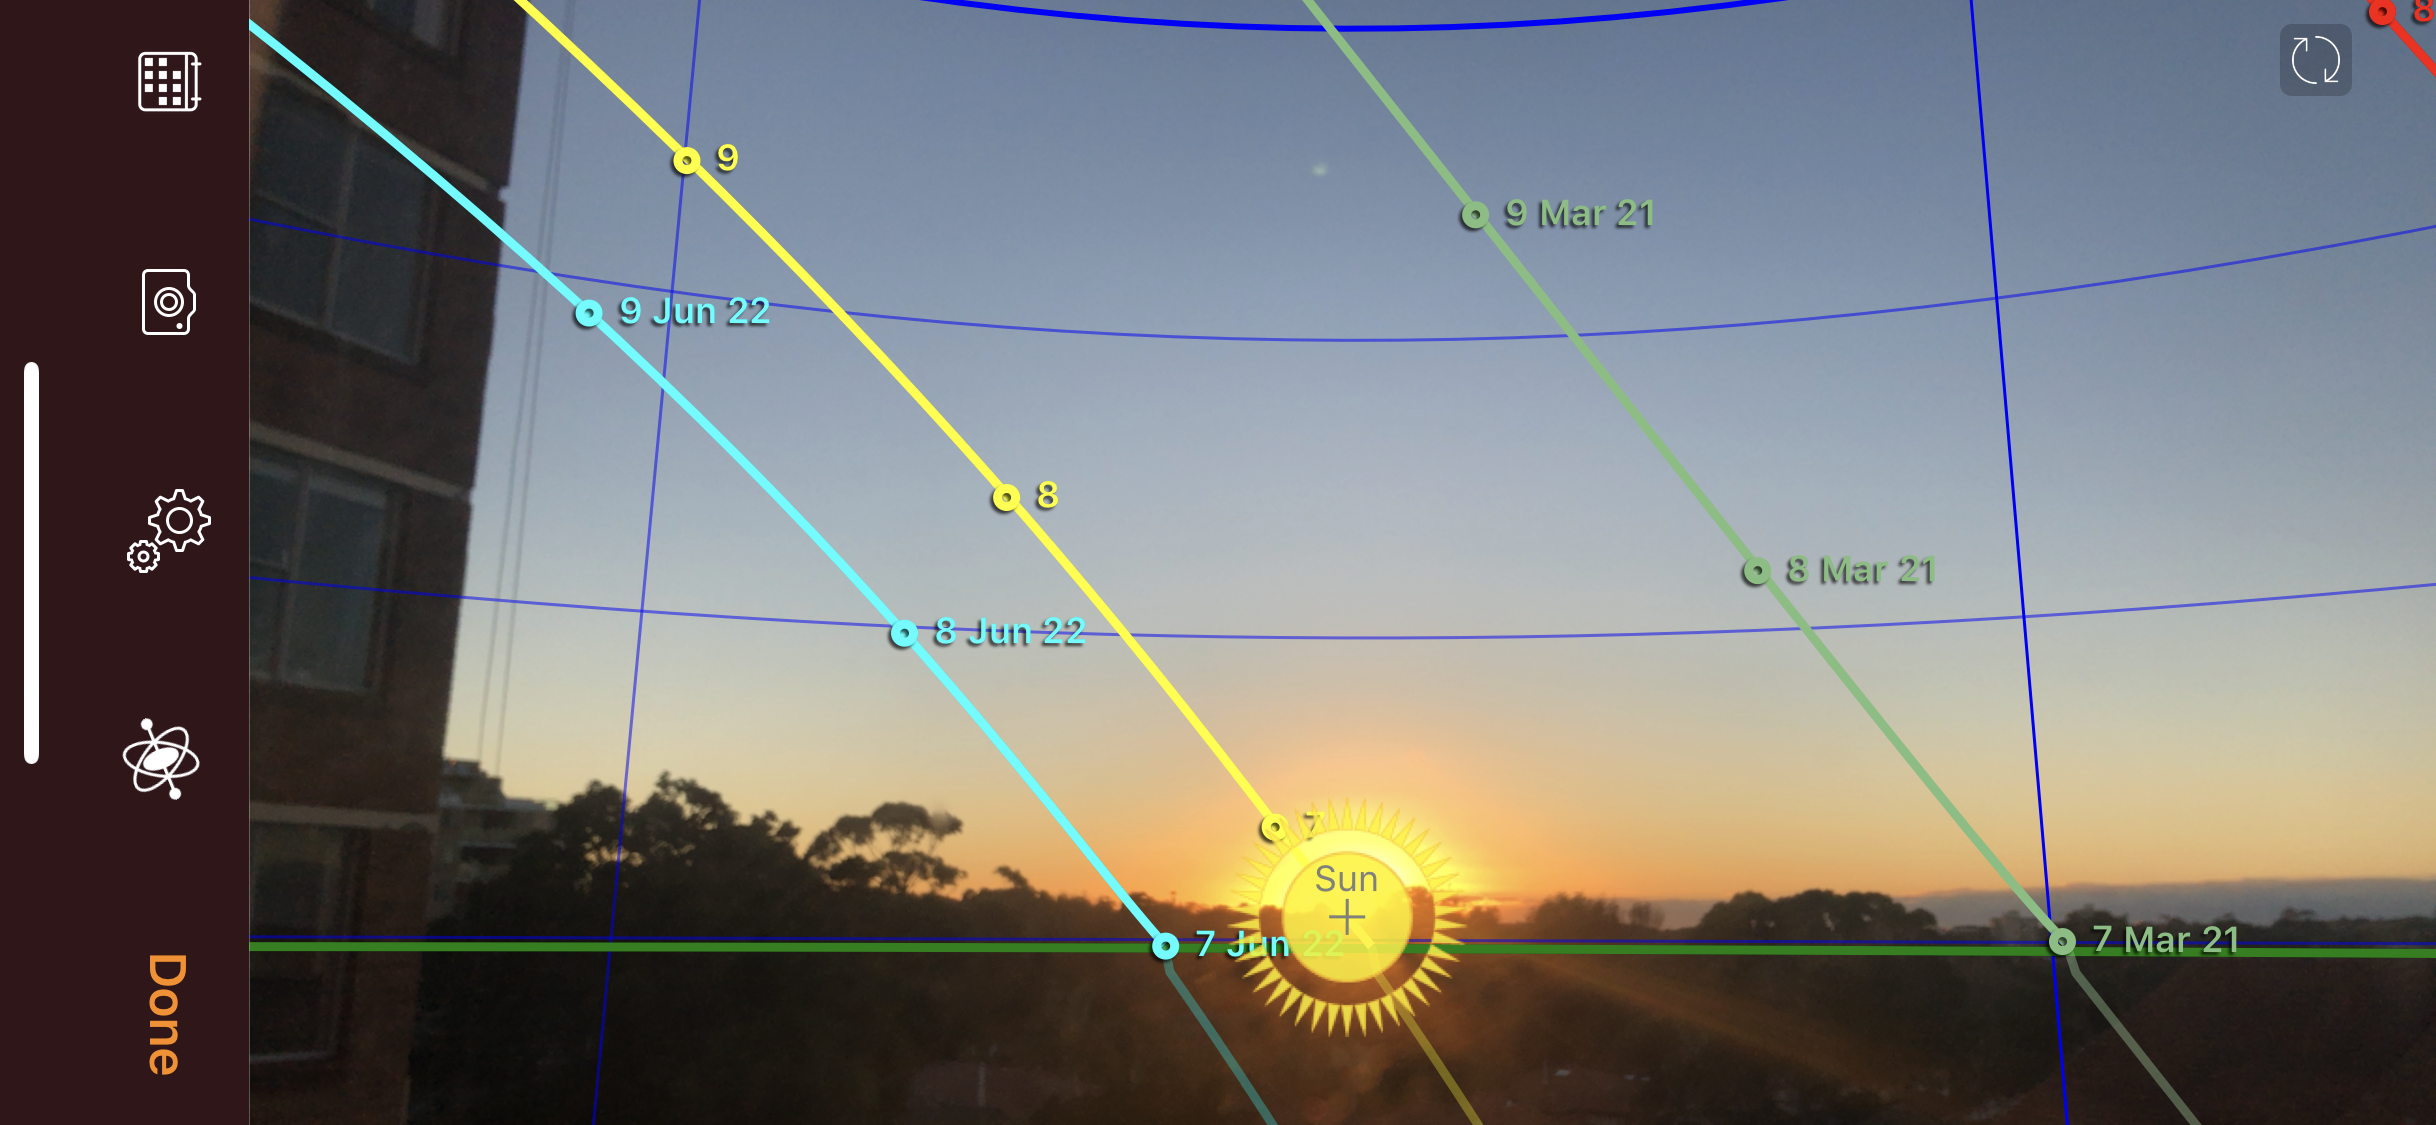
What we can see in the above screenshot is that today the sun is rising at about 6:50am and will follow the yellow path line, disappearing behind the building at about 9:20am – this means that today we could get a maximum, on a cloudless day, of about 2.5 hours of direct sunlight.

By contrast, the blue path line shows the path at winter solstice, which is limited to a maximum of about 2.2 hrs of direct sunlight.

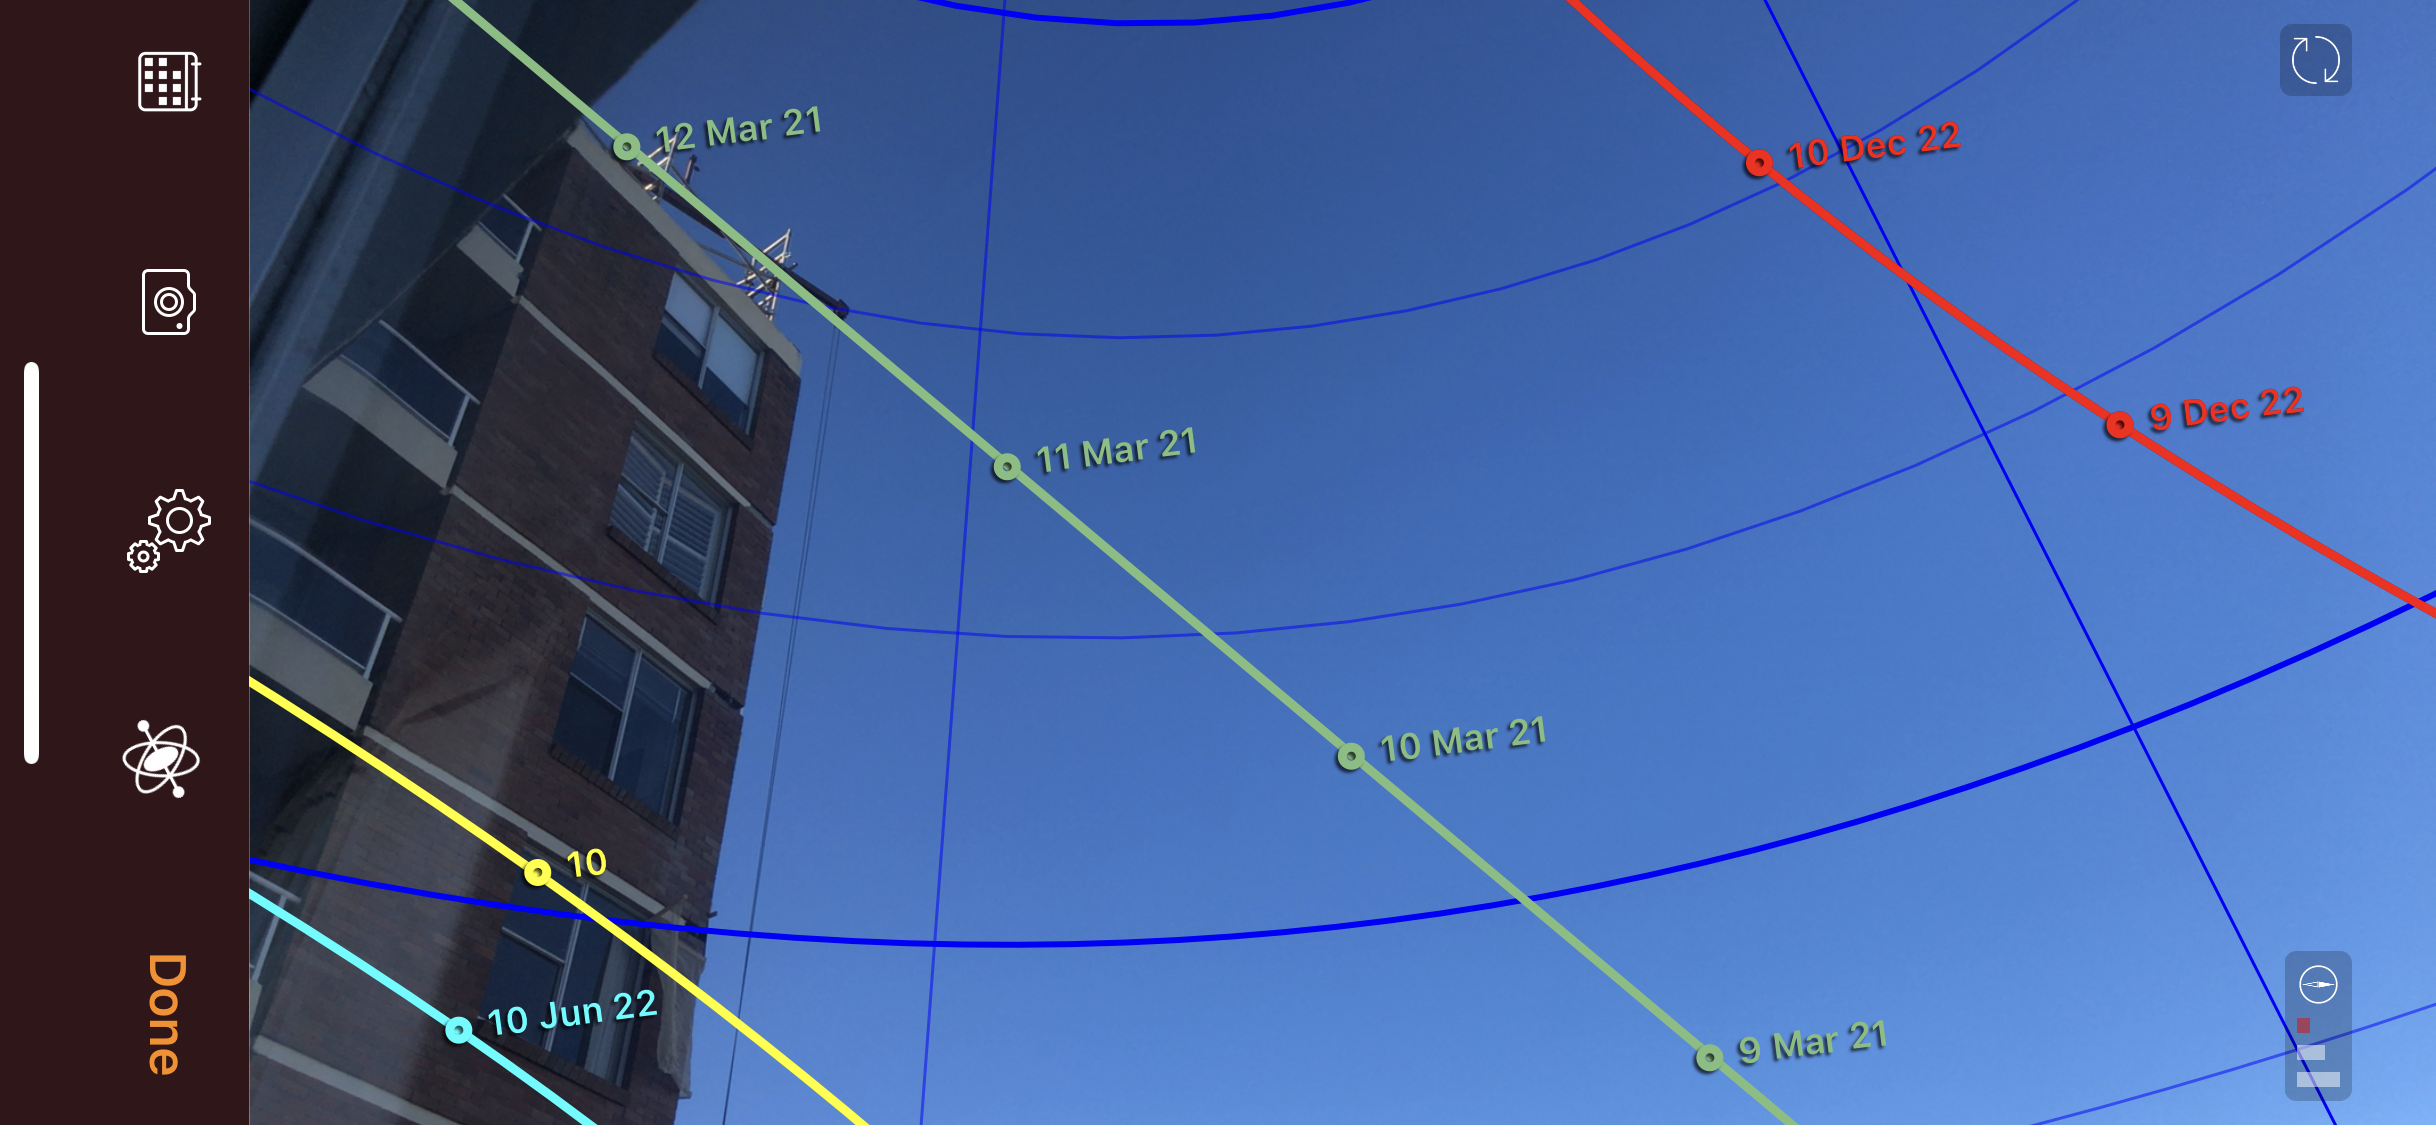
The green line shows the path at equinox (and therefore intersects the horizon roughly due east). Although this path extends well above the top of this particular screenshot, and you would point the camera upwards to see the full extent of that path, as I did here to obtain the following screenshot.

Here we can see that on the green equinox path line the sun remains out until just after 12pm, after having risen at around 7am, so provides a maximum of just over 5 hours of direct sunlight.

Following the red line (summer solstice) in a similar fashion shows rise at just before 6am and also disappearing at about 12am, so provides a maximum of about 6 hours sunlight.

What further conclusions could we draw?

This window gets morning sunlight year-round. Nice! However, in mid-winter it receives a maximum of only just over 2 hours (on sunny days), and then only at low solar elevation (disappearing behind the building when it has only risen to about 20 degrees elevation). This means that this room might be somewhat cool in winter – and especially so when the morning is cloudy. In spring, summer or autumn/fall though, it receives quite copious amounts of sunshine and you might need shades if you aren’t a full-on sun lover, or want to protect items in the room from UV exposure.

How to Calibrate the Heading

As you can see from the above analysis of this window’s sunlight, having an accurate heading on your device is important as if it is not accurate, it can significantly distort the projected timing of the sun’s emergence or disappearance into shade.

Sun Seeker calculates the position of the sun very accurately – to better than one second or arc – but the device’s compass may not be very precise, can be significantly affected by any surrounding magnetic interference, and may need “massaging” to bring to optimum accuracy.

Therefore I strongly recommend that, if you are doing anything more than getting a rough overview of solar exposure, rather than relying on the compass being accurate, you use one of the following methods instead.

  1. Set the heading manually from the actual sun’s position (only possible if sun is visible from your current position of course). To do this, first switch the 3D view into gyroscope only mode (by tapping on the compass icon symbol in the toolbar), and then manually drag the screen until the sun icon aligns with the actual visible sun. Once you have done this, the heading will likely on drift very slowly out of correct alignment – just recheck it and re-align it in the same way, from time to time, as needed to maintain the accuracy.
  2. Set the heading manually from the known position of a visible landmark, by using Sun Seeker’s Reference Azimuth feature. For a full explanation of how to use this feature see this earlier blog post: https://ajnaware.wordpress.com/2014/08/19/sun-seeker-how-to-use-the-new-azimuth-calibration-feature/

If you must rely on the compass because these other methods are not feasible in your current circumstances (i.e. sun not visible, and no known landmarks are visible), then I strongly recommend that you perform a compass calibration manoeuvre instead, to get the best possible compass performance and accuracy. This involves rotating your device a few times around 3 different axes, while an app that uses the compass (such as Sun Seeker) is open on your device. See the following video for a demonstration.

Sun Seeker Pro for macOS

[ Republishing – this article was first posted Nov 8, 2016 ]

Icon_v1Sun Seeker Pro is a macOS app that projects solar path, solar energy, sunlight exposure and other solar related information onto Photo Sphere images or other user-supplied images such as site plan or overhead architectural schemas, and performs various types of analyses on this data, including auto-generated shade data.

Some things you can do with this app:

  • Visualise the annual solar path over photo imagery
  • Visualise solar direction for all hours, all seasons on on overhead satellite view, or site plan
  • Auto-generate shade silhouette data directly from the Photo Sphere
  • Get reports of sunlight exposure periods (taking into account shaded areas)
  • Get detailed reports of solar energy availability, based on selectable panel characteristics (taking into account shaded areas)

CremornePointA

The app contains a couple of demo locations for you to play with. You can open these to view them by choosing Location / Open from the app’s menu or Location button. The demo projects already contain Photo Sphere images, which may be panned and zoomed in the 3D view.

However, when creating a new location project for your own chosen locations, typically you will first want to obtain a Photo Sphere image for that location. This might be a site at which you intend to shoot a movie scene, a location (roof) on which you want to install solar panels, the centre of a window in your house for which you want to find annual sunshine hours, a site for a tennis court for finding best playing hours, a location at which you intend to take a photo of a sunrise or sunset, the location of a tree or plant whose solar exposure you want to examine, etc.

Note that you can use the app without a Photo Sphere, simply by searching or browsing for any address or map location. However, the most powerful features of the app (especially when using shade data) rely on having a Photo Sphere for the location in question.

Photo Sphere images, which are also known as spherical photos, or 360deg photos, can be taken with Google’s free “Street View” app, available on both iOS and Android. You use this app to take a series of photos which cover the entire sphere, around, above and below where you stand. The app automatically merges the photos (also known as “stitching”) into one large rectangular area that is a linear representation of the entire spherical view. You can export any Photo Spheres you take and use them to open a new location project in the Sun Seeker Pro app.

Photo Spheres may also be taken in a single shot with a dedicated spherical camera, such as the LG 360, GoPro Omni, Samsung Gear 360 VR, Ricoh Theta S, and others – not my sponsors 🙂

When you create a new location project with a Photo Sphere image, the app reads the geotagging information that forms part of the Photo Sphere’s internally stored metadata. If this information is complete and correct, then the app will automatically already be set up with the exact location and compass heading (azimuth) on which the photo is centred.

In those cases where the location and heading information included with the Photo Sphere are either missing or potentially inaccurate, the Sun Seeker Pro app provides some editing and calibration tools.

The Sun Seeker Pro app also automatically finds regions of shade in the Photo Sphere image. In many cases this automatic shade detection is quite accurate. However, adjustments to shade areas may be made manually if required.

This shade information directly affects various reports that the app generates, both in terms of insolation times/periods and in terms of solar energy availability calculations for the site.

Once you have created a location project with a Photo Sphere, you can switch between any of the following views:

  • Compass – an overhead hemispherical view
  • Map – an overhead satellite image map view, with solar direction arrows overlaid
  • Image – viewer for an (optional) user supplied overhead image for this location, which could be a satellite image from a browser or another map application, overhead photo from drone, or a site or house plan or drawing (which must already be aligned with north upwards).
  • 3D – a viewer of the (optional) Photo Sphere, for this location, which can be zoomed and panned to see areas of interest, with solar path and position overlaid.
  • The user can set and date/time, scroll date or time, and also even play forward or backward through time for any of these views, to see the solar position and path update correspondingly.

Comparing Satellite Image Providers in iOS and OSX

The Sun Seeker iOS app includes a map view which allows users to see an individual property with solar directions and hours overlaid. This is a valuable way of visually assessing a property’s solar exposure. However, to be especially useful, it does require good-quality (i.e. high resolution) satellite imagery to be available.

In older iOS versions Apple used Google as a maps provider via MapKit, but that changed with iOS6 when Apple introduced it’s own maps, and the unfortunate consequence was that many users of Sun Seeker found that after upgrading to iOS6, the quality of satellite images degraded substantially, as evidenced by numerous customer complaints.

However Google saved the day, eventually, by releasing their own Google Maps SDK for iOS, which allowed me to switch back to showing Google satellite imagery in Sun Seeker, and thankfully the complaints dried up.

Fast forward a few more years and Apple has put a lot of effort into improving their map products. In fact, using Apple’s own Maps app, the satellite image resolution is, in some cases, better than Google’s. However, the odd thing is that this higher resolution imagery appears to be available only in Apple’s own Maps app – and apps that use MapKit still have much lower quality imagery.

The following images from an iPhone 6S running iOS9 illustrate this clearly. They are both for the same location (an apartment block on Sydney’s lower north shore) zoomed in to maximum possible amount.

  • Image on Left – Apple Maps app
  • Image on right – Wind Seeker app using Apple’s MapKit

Note – The imagery used here is identical to that found in Apple’s OSX Maps app and in Apple’s MapKit on OSX respectively i.e. the product offering is consistent between iOS and OSX.

So oddly, Apple is offering far lower satellite image quality in MapKit than they offer in their own apps.

In comparison, the following images, at the same location, and also zoomed in to the maximum allowed level, show the situation with Google’s imaging.

  • Image on Left – Google Maps app
  • Image on right – Sun Seeker app using Google Maps SDK for iOS

The main conclusions are:

  • Apple Maps has some excellent quality satellite imagery available – higher quality than Google’s imagery in this particular example, although despite this they do not allow as high a zoom level as Google does.
  • For some unknown reason, Apple offers lower quality imagery via MapKit than they do in their own Maps app – versus Google where their own app offers the same quality as they allow 3rd party apps to show.

This is unfortunate for my plans to build an OSX version of the Sun Seeker app, in particular because Google does not allow it’s imagery to be used for free by apps on any platforms other than iOS and Android. So my options appear to be:

  • Use Apple’s MapKit – this may not offer adequate satellite image quality for many locations, and the app must then be sold via Mac Appstore, conceding 30% of app revenue to Apple.
  • Use Google’s Maps API via an embedded web view – offers good quality imagery, but must then pay minimum of US$11k per annum licensing fees. Being an ongoing license fee, this implies that the app would have to use some form of ongoing subscription for its revenue, which may be challenging to implement.
  • Do not include any map view functionality in the app – which would be a significant degradation of the app’s feature list, and sabotage it’s chances of ever being a viable product.
  • Hold off for now, and just hope that Apple are just about to release upgraded MapKit satellite imagery capability…

Have I missed other options? What would you do in this situation?

Everywhere – Timezones, Holidays and Current Weather

Everywhere Icon

AppStore

Another app is born. 🙂 This one has the potentially grandiose title “Everywhere“. But in fact that is exactly what it’s about! This app keeps you in touch with the world.

At a glance, you can see

  • Current local time
  • Timezone
  • Current temperature and weather
  • Next forthcoming holiday

You can create a list of any locations  that interest you – for example, where-ever your family, friends, colleagues and business associates live and work.

And as an additional tool to help you work out the crazy timezones of this world, it offers a fantastic scrolling full-screen visual zone comparison table. So no longer any need to accidentally call your uncle when it’s 3am in his part of the world.

And along with the time is a color-coded time-status that indicates, again at a glance, whether each location is in normal working hours, normal waking hours, nighttime hours, or public holiday hours.

In fact this app is not entirely a new creation – it has heritage (and pedigree!), being a re-incarnation of a much older Windows app called ZoneTrekker, which had the notable achievement of having had the Pentagon, no less, purchase a site-wide multi-user license for it. That harks back to the days when I made my living as a Windows desktop app developer. But with such an illustrious past, I felt it was time to re-birth the concept as a mobile app – so now here it is as a universal iOS app – and in fact much nicer than the original in a number of ways!

App Screens

Everywhere Locations View

Everywhere TZ View

App Guide

Key to Colors

Color-coding is used in various places in the app to indicate time status, for the location in question. The colors are:

  • ■ Light Blue – normal working hours (9am to 5pm)
  • ■ Dark Cyan – non-working but waking hours (7am to 9am, 5pm to 10pm)
  • ■ Dark Green – night-time or sleeping hours (10pm to 7am)
  • ■ Pink – public holidays waking hours (7am to 10pm)

Editing Locations

  • To add a location, tap on the + button, and type in a city name.
  • To delete a location, tap on the Edit button, and then on the – button at the left of the cell.
  • To re-order locations, tap on the Edit button, and then drag entries into the desired order using the drag-bars on the right of each cell.

Holidays List

  • To see a list of the current and next year’s holidays for a given location, tap on the ellipsis on the right hand side of the cell.
  • Note that public holidays are shown with Pink, whereas “observances” which are not usually taken as public holidays are shown with Dark Cyan.


So there is is! Now what are you waiting for? Go and get it!

Indie Mac and iOS Developer Influence Rankings

Here is an interesting take on just who are the most influential indie Apple developers, using a tool for ranking people’s influence in their particular field, based on twitter and website stats.

It was developed by Ross Dawson, who first used it to rank KeyNote Speakers. You can find out more about the algorithm it uses from his detailed and fully-transparent explanation of how it works.

As a result of my special association with him (yes, he’s my brother), I had the opportunity to apply it to my own field of endeavour, and I think it does indeed provide a valuable insight into who the influencers really are. Note that I’ve included myself in the list, not so much for vanity as for the sake of having a good control point. 😉

Here is a snapshot of the rankings as at 11th March 2015 18th Jul 2015. Note – As this is a graphical snapshot, the green buttons are inoperative – they normally would show you the twitter handle and website link used. I hope to replace this with a fully-functioning *live* version, eventually.

Selection criteria I used for appearing on this list
1) Have developed successful Mac and/or iOS apps
2) Write publicly via twitter and/or blog/website about app development, app store and Apple
3) Be posting (only or mainly) as an independent developer i.e. have own website or blog
4) Reasonably prominent – anyone scoring too low in this ranking system may be dropped from the table, for the sake of expediency and avoiding overload

Please note – I have compiled an initial list based on my own conjecture about who was reasonably prominent in this field. If you have a suggestion about who else to add, please let me know via twitter @gpdawson. Note that the individual must have 1) a twitter account and 2) a website or blog for which they are the primary contributors. Generally, anyone with a company website with multiple contributors can’t realistically be included without distorting the results.

LIFX Light Bulbs and IFTTT

I am living with 6 LIFX light bulbs in my home – and I just love the way this allows me to redecorate my working and living space to my whim, both with simple and complex, dynamic lighting schemes. In fact, with these lights, I can’t see myself ever wanting to paint my walls with any particular color scheme again. It’s just no longer necessary – and now seems far too static and inflexible a way to make my home attractive.

image1

I’ve had my fair share of teething problems with the bulbs – at one point, after lengthy email exchanges with LIFX tech support, I returned the entire batch for a new replacement set, after a seemingly endless series of problems with lights falling into and out of being unrecognised by the LIFX app. But to their credit, with the newer bulbs, and more recently with the migration of  LIFX to the cloud, the system is now working really nicely – almost glitch free.

In fact it is this migration to the cloud which has finally allowed the bulbs to achieve some of the amazing potential that they have to make life more fun and more beautiful. Amazing things were promised, but not delivered by previous incarnations of the LIFX apps, which could only perform simplistic local control functions. These were fine for setting up a lighting scheme manually, or showing off the bulbs via a brief light show, but simply didn’t allow any significant form of automation.

This is how my lighting system is set up

  • Hallway – 2 lights (Door, Hall)
  • Living Room – 2 lights (Behind TV, Couch Lamp)
  • Office – 2 lights (Desk A, Desk B)

I have three “scenes” that I can set manually via the LIFX app on my phone

  • Evening – Living Room lights switched to semi-dimmed warm (orange) glow (and all other lights switched to off) – this creates a warm,relaxed atmosphere
  • Work – Office lights switched to bright cool (blue) glow – this helps concentration and aids clear seeing of detail
  • Arriving Home – Hallway lights switch to semi-dimmed warm (orange) glow – this is helpful when coming home, especially at night, if the lights are off when I come in

So these formed the backbone of the system, and covered 8o% of my lighting needs – the remaining 20% of finer adjustments came by controlling bulbs individually, or just occasionally by selecting some of the special effects offered by the app – one my favourites being a dynamic northerns lights type display, which unfortunately seems to have dropped out of the latest version of the app. However, there is still plenty of scope for playing and fun with the effects provided, and realistically, this is more of a show-off feature than something I’d want to use on a regular basis.

But the pièce de résistance comes via the ability to add automation via IFTTT‘s LIFX Channel. So now I have added the following “recipes”:

Turn on lights at sunset

When the Weather channel notifies me that it is my local sunset time (trigger), the LIFX channel fades in my Office lights.

Purpose – This is designed to help me maintain good light when I am sitting at my desk, without needing to manually activate the lights.

Cons – If I am not at home, or not sitting at my desk, these lights come on anyway. In order to counter this, I need to take note of the iOS notification that I receive when the sunset trigger occurs, and then manually switch off the lights.

Turn off lights at sunrise

When the Weather channel notifies me that it is my local sunrise time (trigger), the LIFX channel fades out all my lights (if any happen to be on).

Purpose – This is designed to avoid leaving the lights on unnecessarily, if I happen to have gotten up early and switched on the Office lights manually before starting work. Without this, I often find later that the lights are still on despite having sun streaming through the window.

Cons – No major cons to this one. Perhaps if there is heavy cloud cover, then I wouldn’t want to lights to go right off, but it is easy enough for me to make a manual adjustment if I see the lights dimming themselves and want them brighter.


Turn on lights when I get close to Home

When the iOSLocation channel notifies me that I have entered the area around my home (trigger), the LIFX channel fades in my Hallway lights.

Purpose – This is designed to ensure that lights are on when I open the door, so I don’t have to fumble around in the dark, and use my phone to switch on the lights.

Cons – Unfortunately the IFTTT system doesn’t allow me to combine this trigger with a daylight/nighttime condition, so if it is still daylight, then I don’t actually need lights on as there is already sufficient daylight in the hallway, and in this case I have to switch them off manually after I get home. Another, more subtle, issue is that just occasionally (once in a few days), this trigger gets activated even though I haven’t actually left home. My best guess is that this is due to occasional inaccurate GPS readings which, momentarily, locate me far enough from my true home location so as to trigger the re-entry event once the accuracy improves again. It might be possible to reduce the likelihood of this happening by choosing a larger radius for the trigger area – I’ll experiment with this further over time.


Note that a common factor in the cons of these automation methods is the lack of ability to combine triggers. After all, it seems a fairly basic need to have your lights to come on automatically only once it is already dark. As the IFTTT system does not allow you to combine triggers from different channels, it seems that the only way to achieve this would be for LIFX to make an addition to their own IFTTT channel by adding an extra trigger condition i.e. whether or not it is currently daytime or night-time at your given location. I will be bringing this post to their attention. If you agree with me on this one – and it does seem to be a crucial issue for allowing LIFX bulbs to achieve more of their true potential – then please let them know you want this too: Submit request to LIFX

HyperAltimeter – Barometer and Altitude Tracker

HyperAltimeter

Here it is! I’m excited to present my first new app in a long, long time! It’s called HyperAltimeter, and it’s all about pressure and altitude, and pushing the limits of what can be done with the new barometer sensor that is embedded in your iPhone 6 or 6 Plus.

Whilst most smartphones are already equipped with GPS receivers, which do provide altitude readings, these are not typically very accurate. The GPS system is designed to obtain your horizontal position to a good degree of accuracy, but accuracy of altitude was not a key design factor.

However, the new barometer sensors are very sensitive, and can detect pressure changes as small as those experienced just by raising the device from your chest level to above your head. This means that it excels at measuring changes in height as you climb stairs, or walk or run a course.

However, longer term changes in pressure due to moving weather systems means that height changes can only be determined accurately over short periods of time, and similarly it also means that your altitude from sea level cannot be determined accurately from barometric data, alone.

The solution to longer term accuracy in height changes and absolute altitude measurement comes from combining the device’s barometric data with weather data i.e. readings of local pressure and temperature.

Amazingly, from first idea to this app becoming available in the app store was just six days! I’ve typically spent one to three months developing each new app, and then many more months, over time, enhancing and refining them. But in this case, by leverage code and experience from my other apps, I submitted the app to Apple after just five days. And then Apple’s approval came within twelve hours. By comparison, review time for app submissions is currently averaging about twelve days. So it seems Apple is especially keen to help along apps that make use of the iPhone 6’s new capabilities.


About the App

This app measures your altitude via three very different means (or via two means if your device doesn’t have a barometer sensor). This allows much greater accuracy than relying only on the device GPS sensor alone to find your altitude.

In fact the standard GPS readings of altitude are far less accurate than the other two methods, so it is provided here mainly just for the sake of comparison.

The three methods are:

  1. GPS sensor
  2. Online mapping survey data
  3. Barometer sensor combined with current local atmospheric conditions

Altimeter Screen

This screen shows all available altitude-related data, as well as showing your current location on a map. The displayed data items are:

  • GPS Altitude – this is the altitude from the standard GPS sensor. Note that the given accuracy is one returned by the sensor, although by observation the stated accuracy range is sometimes too small, and does not overlap the more accurate measurement taken via the two other methods.
  • Map Altitude + Δh – This shows the altitude for your current location as determined via online mapping data. It is generally very accurate in relation to gound level. If you are in a high-rise, use the Height Above Ground field to enter your local height – this will automatically then be included in the altitude value shown in this field.
  • Barometric Altitude – Barometer sensor combined with current local atmospheric conditions (means sea level pressure and temperature), which are then used to calculate your actual altitude. Note – this method is only available on devices which include a barometer sensor.
  • Device Pressure – Shows the actual pressure reading from the device barometer, as used in the altitude calculation.
  • MSL Pressure – Shows the mean sea level pressure from the nearest available weather observation location, as used in the barometric altitude calculation. Tap on this cell to see detailed information about the local weather data it is currently using.
  • Height Above Ground (Δh) – this is a value you must enter yourself, if you are in a high-rise building or otherwise abve local ground level, and is used to refine the the Map Altitude calculation, above.


Screen Shot 2014-10-17 at 1.09.06 pm


Graph Screen

This view allows you to see how altitude is changing with time, via a constantly updating graph. The three option are:

  • GPS Altitude – Shows the altitude data returned by the device GPS sensor.
  • Barometric Altitude – Barometer sensor combined with current local atmospheric conditions (means sea level pressure and temperature), which are then used to calculate your actual altitude. This value is retrospectively adjusted when each new local mean sea level pressure reading is obtained, to take account of the atmospheric pressure trend. Due to these adjustments, this graph should show reasonable stability over the long term.
  • Δ Altitude – Shows the relative difference in altitude from when you first started the app, or tap the reset button, based on changes in pressure. This is very accurate for measuring short-term altitude changes, such as going up or down stairs, taking short walks or runs across terrain etc. Over longer time periods it will likely suffer from drift due to changes in atmospheric pressure, due to moving weather systems. For this reason you may want to reset this graph just before using it to make a measurement of change in your altitude.
  • Pressure – Shows the raw pressure readings from the barometer in your device. This value changes over time for two reasons – one is when you move up or down, as pressure changes with your altitude, and the other is changes in local atmospheric pressure due to weather systems and wind gusts. If you keep the device stationary, then this graph will reflect only atmospheric pressure changes.


Screen Shot 2014-10-20 at 7.31.11 am

Screen Shot 2014-10-17 at 1.11.10 pm


So what are you waiting for? Go and get it from Apple’s app store!

Sun Seeker – How to use the new azimuth calibration feature

I’ve just submitted an update to Sun Seeker for iOS – v4.3.

This update contains an experimental feature which addresses one of the most difficult aspects of using the device’s compass to obtain an accurate heading, when using the augmented reality 3D view to see the solar path. This article seeks to explain what this feature is about, and how best to use it.

Note that the Android version of Sun Seeker does not yet have this feature. I will be relying on feedback from iOS users before deciding whether to implement it in the Android version.

In the last major release (v4.2), I introduced the ability to toggle between Compass+Gyroscope mode and Gyroscope-only mode. This was already a big leap forward, because the gyroscope-only mode allows users to manually adjust the 3D View heading simply by dragging it manually.

SS_Blog2

SS_Blog1

The gyroscope-only mode allows you to set the heading manually, and the device then holds your setting relative to the gyroscope. Although there is likely to be a slow drifting of the gyroscope-only data, provided that you were able to set the heading accurately, this will work well for short periods of time – more than likely long enough to get all the information you need from the app.

Of course this all depends on you being able to set the heading accurately yourself. If the sun is out, then this is very easy – just line up the sun icon in the camera view with the actual position of the sun! Easy. 🙂

But what if the sun isn’t out? Well this is where the new “Azimuth Finder” feature comes in. Tap on the settings (gear) icon in the 3D View, and you will see two new options at the bottom of the list of settings.

SS_Blog3

  • Show Reference Azimuth – If you have already selected a location, use this option to to toggle the display of an azimuth line corresponding to the selected location.
  • Set Reference Location – Tap this to open the “Azimuth Finder” view, and select a location or landmark within your line of sight, to use for your reference azimuth.

SS_Blog7

All you have to do in this view is to use the map to browse to a landmark or location that is visible from where you are now. It must be somewhere that you can identify when looking later through the 3D camera overlay view. When you have found a suitable location, just tap and hold to drop a marker. The app will use geocoding to assign a name or address to the location, and calculate it’s azimuth from the current device location.

In this particular example, I am (just) able to see the top of the Sydney Harbour Bridge from here, despite the rain and low cloud, so that makes a good landmark to use.

Then, as soon as you tap “Done“, you are returned to the 3D View, and there is now a new line showing the azimuth of the selected location. Note that you will only see this line if you are already looking in approximately the right direction! Otherwise you may need to pan around until you bring it into view.

SS_Blog6

You may be able to make out the Sydney Harbour Bridge in this screenshot – just to the right of the chimney, directly below the centre cursor.

As this 3D View is already in gyroscope-only mode, all I needed to do next was to manually drag the white azimuth line to the actual location of the bridge – in this case four degrees to the right. And, voila, we now have a very well-calibrated heading!

Note that if you leave this for a while it may drift off again little by little, due to gyroscope drift. In that case, simply repeat the same calibration procedure.

Once you’ve selected a particular landmark for calibration, it is remembered (and the heading automatically adjusts itself if you change location yourself), so you can just switch the reference azimuth line on or off via the settings icon. And at any time you can choose a different reference location too, as you will obviously need to do if you move to a new location from which the original landmark is not visible.

Oz Weather Plus – Why I’m releasing it as a new app

The Oz Weather iPhone app was first released on 20th Nov 2008 – yes that’s more than 5 years ago!!! By all accounts, it’s been a highly successful app. Notably, in January 2009, it reached #1 ranking for paid apps in the Australian app store and stayed there for about 10 days, during the period of an intense heatwave, and deadly bush-fires. And over the entire 5 year period, the app has been installed onto hundreds of thousands of devices.

There have also been more than 30 free app updates released during that period, and also an attempt to use in-app purchase to provide new, advanced features, which were much appreciated by a number of users. This also attracted a lot of very negative and vocal feedback from users who thought they should be getting it all for free, and as a result I eventually re-integrated those features into the app and removed the in-app purchase. But the damage was done, and with a competitor who crowed loudly that their own app’s updates would be free forever (they’ve since reneged of course), Oz Weather lost its lead in the app store to them.

And here’s how Oz Weather sales have gone, over the last few years…

Sales_2010_2013

So as you see, despite the many app updates (seen as comments bubbles in the above graphic) new sales have trailed off considerably. There are a number of reasons for this. The biggest one is that competition has increased a lot over the years. In fact it seems that my own openness in posting my app’s sales figures during those early years probably encouraged quite a few other developers to try their hand at it. And then there were the bigger players in the Australian weather field, such as “WeatherZone” and “Elders Weather”, who had just been slow to get into the app store, and eventually figured out how to make their apps more appealing. Some of those competitors innovated with new types of features that I didn’t think would be as appealing to users as they actually turned out to be. More recently still, it seems to have become something of a trend amongst app developers to use weather apps as a kind of test playground for new app design paradigms. And there have indeed been some really nicely-designed weather apps coming out, especially with iOS7 style interfaces.

And it is indeed the iOS7 operating system update that finally prompted me to consider starting afresh. And with this impetus, suddenly there was a surge of new enthusiasm to create several innovative new features, some of which had been floating around in the back of my head for years, but not seen the light of day due to lack of motivation stemming from the various issues described above.

The big issue was, of course, whether or not this could or should be offered as a (necessarily free) update to the existing Oz Weather app, as opposed to creating a brand new app. I’m sure readers of this post will be well aware of the many precedents for creating new apps as opposed to providing free updates – the first big one of which was Tweetie – and they got some really bad reactions, although over time there has been greater and greater acceptance that this is pretty much a necessary way to go in order for app developers to survive, in particular given the shortcomings of in-app purchases, and the fact that they simply aren’t workable in many types of non-game category apps.

A key metric to consider in my own case is that I’ve spent around 1000hrs building the new app and its associated server code. Even if I were to value my time with only a modest hourly rate, at the current rate of app sales, it would take much more than a year of ongoing income, in fact maybe several years, to pay for the time I’ve invested in it. Obviously that would not be a sustainable way to work or run a business.

Also, many of the existing Oz Weather users bought the app more than 3 years ago – most of them paid around $2.49 for it, although it’s since gone down to $1.99 due to Apple changed pricing tiers, combined with ongoing downward price pressure from the competitors. Further, many users do continue to use the app on a daily basis – so it would be hard for them to argue that they haven’t got good value for money.

Then, of course there are those users – a much smaller number – who bought the app more recently – and it will probably feel less fair to them not to be getting a free upgrade. However, I am not intending to stop providing data feeds to the existing app, at least for the foreseeable future. (I don’t want to make any rash promises that I might not be able to honour – it might be necessary to drop the feed at some point down the line.) So those users will continue to have a fully-featured, working app – the same features that were advertised to them in the app store, and which they paid for. I do know it will suck a little bit more for those who bought it only really recently. So if you really feel that badly about paying for the upgrade, and are financially stressed by it, what the hell, why not send me an email, via the app’s About / Email us button, and if you really make a good case, I’ll see if I can help out.

There it is – that is why I’m releasing the new version of Oz Weather as a new app. For better or for worse. So may god help me. Amen. 😉

Sun Seeker Sizzles!

The Sun Seeker app has continued to be enhanced and honed in a series of updates, the most recent being v2.8, which includes a modernised interface – yep, those are indeed flat button faces. 😉

Sun Seeker v2.8 compass screen
Sun Seeker v2.8 Compass Screen

These updates seem to have attracted a bit of positive attention resulting in several new blog reviews, culminating in the following fabulous review from top-notch reviewer John Martellaro (@jmartellaro) of The Mac Observer. This is a must-read review, not just because it is positively glowing, but also because John saw fit to include my detailed answers to his probing questions, including some inside information on how the app works, and especially importantly on how to ensure optimum compass calibration of your device.

Just to show a little more of the app here, my own favorite feature update is the ability to select date and time on the map view via a scroller.

Sun Seeker Map View