I’ve just submitted an update to Sun Seeker for iOS – v4.3.
This update contains an experimental feature which addresses one of the most difficult aspects of using the device’s compass to obtain an accurate heading, when using the augmented reality 3D view to see the solar path. This article seeks to explain what this feature is about, and how best to use it.
Note that the Android version of Sun Seeker does not yet have this feature. I will be relying on feedback from iOS users before deciding whether to implement it in the Android version.
In the last major release (v4.2), I introduced the ability to toggle between Compass+Gyroscope mode and Gyroscope-only mode. This was already a big leap forward, because the gyroscope-only mode allows users to manually adjust the 3D View heading simply by dragging it manually.


The gyroscope-only mode allows you to set the heading manually, and the device then holds your setting relative to the gyroscope. Although there is likely to be a slow drifting of the gyroscope-only data, provided that you were able to set the heading accurately, this will work well for short periods of time – more than likely long enough to get all the information you need from the app.
Of course this all depends on you being able to set the heading accurately yourself. If the sun is out, then this is very easy – just line up the sun icon in the camera view with the actual position of the sun! Easy. 🙂
But what if the sun isn’t out? Well this is where the new “Azimuth Finder” feature comes in. Tap on the settings (gear) icon in the 3D View, and you will see two new options at the bottom of the list of settings.

- Show Reference Azimuth – If you have already selected a location, use this option to to toggle the display of an azimuth line corresponding to the selected location.
- Set Reference Location – Tap this to open the “Azimuth Finder” view, and select a location or landmark within your line of sight, to use for your reference azimuth.

All you have to do in this view is to use the map to browse to a landmark or location that is visible from where you are now. It must be somewhere that you can identify when looking later through the 3D camera overlay view. When you have found a suitable location, just tap and hold to drop a marker. The app will use geocoding to assign a name or address to the location, and calculate it’s azimuth from the current device location.
In this particular example, I am (just) able to see the top of the Sydney Harbour Bridge from here, despite the rain and low cloud, so that makes a good landmark to use.
Then, as soon as you tap “Done“, you are returned to the 3D View, and there is now a new line showing the azimuth of the selected location. Note that you will only see this line if you are already looking in approximately the right direction! Otherwise you may need to pan around until you bring it into view.
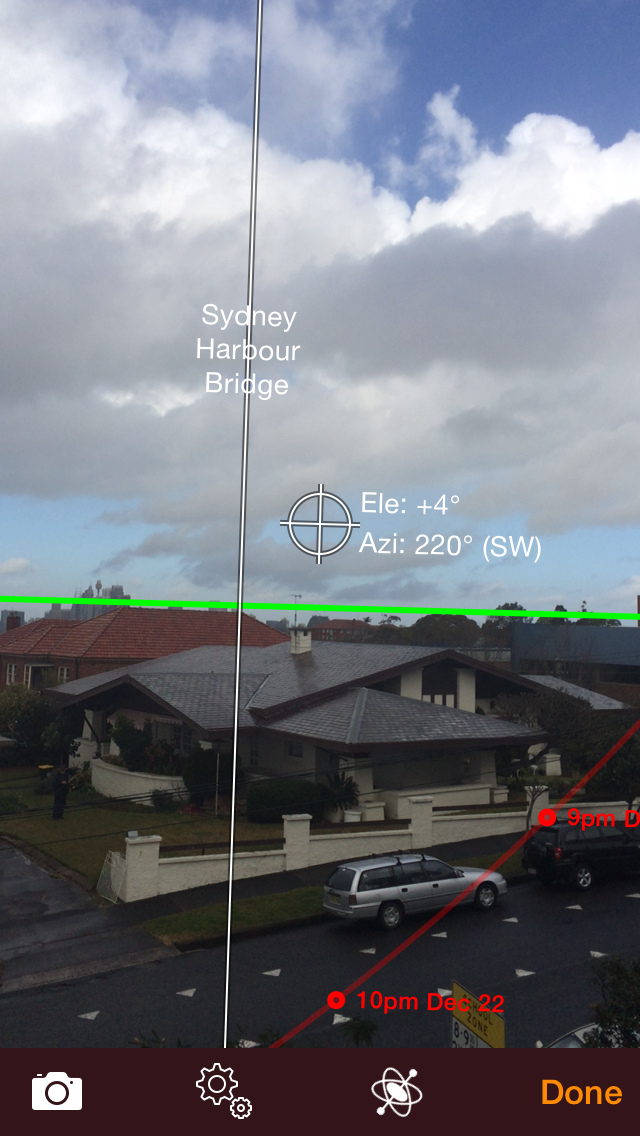
You may be able to make out the Sydney Harbour Bridge in this screenshot – just to the right of the chimney, directly below the centre cursor.
As this 3D View is already in gyroscope-only mode, all I needed to do next was to manually drag the white azimuth line to the actual location of the bridge – in this case four degrees to the right. And, voila, we now have a very well-calibrated heading!
Note that if you leave this for a while it may drift off again little by little, due to gyroscope drift. In that case, simply repeat the same calibration procedure.
Once you’ve selected a particular landmark for calibration, it is remembered (and the heading automatically adjusts itself if you change location yourself), so you can just switch the reference azimuth line on or off via the settings icon. And at any time you can choose a different reference location too, as you will obviously need to do if you move to a new location from which the original landmark is not visible.

Such a nice article !! Which present complete information to use the new azimuth calibration feature.
Hi, I have version 6.4 (iOS) and can’t find the azimuth calibration feature as described in this post.